Sunday, April 7, 2013

It's no big deal, Lemon curd (Microwave Version)


A spoonful of lemon curd over my breakfast makes my medicine oatmeal go down in the most delightful way! To really appreciate how HUGE a deal that is for me I direct your attention to this.

Those of you who make curd on the stove top know that it involves stirring, stirring, stirring AND stirring over a low heat until the thing thickens. It's a tedious process during which my mind wanders. I start thinking about socks and laundry, I make the grocery list in my head.  I wonder.....dagnabbit will this thing be done in time for the next episode of Game of Thrones? I look down......

Gah! I have scrambled eggs. Not cool.

Today you are gonna want to high five-me.

If we aren't already friends, you are going to want to be my friend.

Hello friends! I have an easy peasy lemon curd recipe for you. It seriously is no big deal to make this. No scrambled eggs, I promise.

The hardest part is keeping the spoon out of your mouth between stirs.  

FYI, you might not want to do that as I have it on good authority that hot lemon curd burns like a motha!

That’s real.

Before this, I purchased lemon curd at the gourmet shop. An extravagance to be sure since this one little jar of curd costs a small fortune. But those days are behind me since I discovered this recipe.

The microwave has got to be the strangest invention of modern times. Almost everyone owns one of these giant, space-age looking heaters but few actually cook with it.

I am one of the few.  Until now....

now I cook curd, a lot of curd.

Please don't freak out.....it's just juice, eggs, sugar and butter stirred in the microwave.

You can totally do this.

And when you are done put a dollop over your porridge,

in your yogurt

or on your pancakes,

bake a lemon meringue pie

or just eat it straight from the spoon, cause yeah ..........that's not strange, not in the least, especially not in my home.


Lemon Curd ( Microwave )
yield 2 cups

1 cup freshly squeezed lemon juice (unsweetened)
3 eggs
1 tsp of lemon zest
1/2 cup plus 1 tablespoon granulated sugar
1/2 cup butter (melted)
pinch salt

METHOD
Add sugar to lemon juice and taste. Add more sugar a tablespoon at at time until you are satisfied with the taste. Most recipes I have seen call for a cup of sugar so my using 1/2 cup should tell you that I like a fairly tart curd. Adjust sugar to your taste.

In a 4 cup sized glass measuring cup, melt butter and let it cool. To this, add the now sweetened lemon juice, and eggs. Mix well with a whisk.
Microwave on high for one minute.
Remove from microwave and whisk vigorously.
Repeat, microwaving for one minute at a time and whisking until it coats the back of a spoon. (depending on the microwave this will take 3-5 mins)

In my microwave the curd was done in 4 mins.

Spoon test: Dip a small spoon in the curd. Let it cool a bit and run your finger across the back of the spoon. If the curd holds the finger mark, it is done. If the custard flows and closes the mark then it needs to cook some more.

Once the curd is done transfer to a jar and store in your fridge.

Assuming you don't eat it all right away, it lasts 2 weeks.

COOK'S TIP
When I don't have lemons I use a reputable brand of unsweetened, from concentrate lemon juice.



Sunday, March 31, 2013

Badusha treats for Phagwah (Holi)


What a weekend!

We are fortunate to have two public holidays and an extra long weekend to celebrate. This year we have a bit of an unusual situation as other holidays also fall within this Easter weekend so let me say Happy Easter,  Happy Shouter/Liberation Baptist Day and Happy Holi!


Before I continue I must say thank you to my friend Gareth Leigh for very kindly allowing me the use of his images of Phagwah.

In Trinidad the festival of Holi is called Phagwah. We don't have any sweets as such that are associated with it however I discovered that in India sweets made with bhang are popular at this time. Bhang, by the way, is cannabis.

Hmmmm.

Right, so in lieu of that I bring you something a little less exciting, the consumption of which is not likely to land you in jail.

I loved these Indian treats. They were quite reminiscent of  Trinidadian fat kurma. It takes a little effort to make the pleats but if you are not so inclined to go through the trouble, just shape them as flattened balls with a slight indentation at the top.


Badusha

Ingredients

Makes 8 - 10

1 1/2 cups flour
1/4 cup ghee or butter at room temperature
1/2 tablespoon vegetable oil
2 tablespoons Greek yoghurt
1/2 tsp baking soda
1 tsp sugar
1/4 cup water ( or more- adjust accordingly)

Oil for deep frying

Sugar Syrup
1/2 cup sugar
3/4 cup water
pinch of cardamon
2 strands saffron*optioanal
1/4 tsp ginger
3/4 tsp of lemon juice

METHOD
Melt the butter/ghee. In a mixing bowl add melted butter, yogurt, oil, baking soda, and sugar.

Add the flour and mix well with a whisk. It should look crumbly like bread crumbs. Add water a little at a time to form a soft dough. Knead for 10 mins. Divide into lemon sized balls. Cover and set aside. Let rest for 10 mins.

Shape the badushas with decorative edged swirls or flatten the balls slightly and make a dent in the top with your thumb.

Here is a video to illustrate how the swirls are done.


Heat oil (medium high heat) in a frying pan. Check oil by adding a pinch of batter. If the batter rises quickly then it is the correct temperature. Fry the badushas 3 at a time, turning the heat down occasionally so that they do not burn and are cooked through the middle.

Line a tray with foil. Grease the foil with butter and set aside.
Add sugar, cardamon, ginger and water in a pan to make the sugar syrup. Cook on medium-high heat until the syrup makes a long, slow, string when your spoon is lifted. Quickly add the lemon juice ( to avoid crystallization).

Dip the badushas in the sugar syrup turning until coated on both sides. Transfer to the tray with the buttered foil. Once the glaze has dried you can store them in an airtight container for a few days.


Thursday, March 28, 2013

Jamaican Red Snapper Stew - Photo Update

Fish becomes the star ingredient in many Trinidadian homes during the season of Lent. Tomorrow being Good Friday we will be having Fish Broth. While planning for that I was reminded of the meal in the picture below. I was never satisfied with my initial images of this dish so I retook the photo. As you can see from the date I forgot all about posting it. Better late than never, I guess. The recipe can be found here. 


Saturday, March 9, 2013

Trinidad Green seasoning


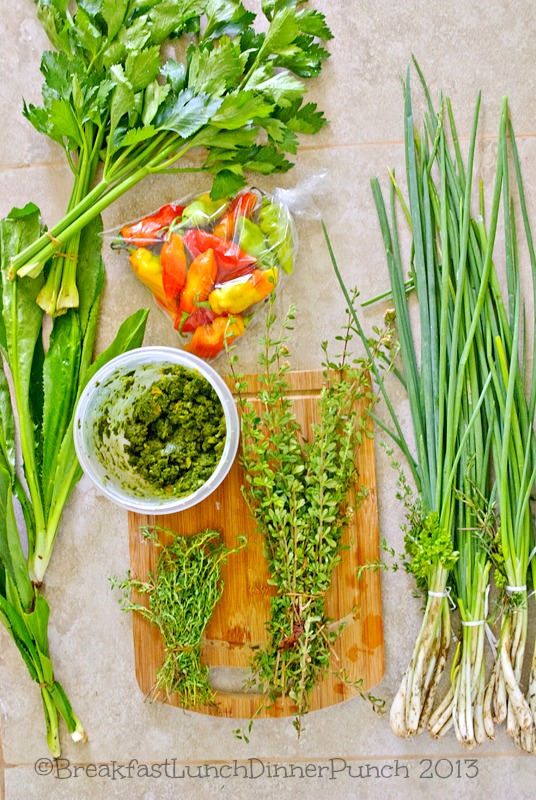
The foundation of cooking meat the Trinidadian way is all about the seasoning. All meat (beef, chicken pork and fish) is marinated in a seasoning mix of crushed herbs, onions, garlic and peppers. This blend of herbs and aromatics is called 'green seasoning'. It is incredibly versatile and is good in soups, stews, rice, and bean dishes. Many Trinidadians whip up a batch of this stuff on a weekly basis. The blend of seasoning is based on personal preference and varies across households. Traditionally some or all of the following ingredients are used: 


 Celery 
There are three kinds of celery that are grown for cooking purposes.
Stalk celery is imported into this country from America and it is grown for its crunchy stalks which can be eaten raw. 

Leaf celery (pictured above) or Chinese celery is grown primarily for its leaves which are used as a herb. The stem is also edible raw but much more pungent than stalk celery. The stalks of leaf celery taste better cooked. This type of celery is a key ingredient in Trinidad green seasoning and both leaf and stalks are used.

Root Celery also called celeriac is grown for its bulbous root. It is not available in Trinidad.


Culantro
The Trinidadian name for culantro (Eryngium foetidum) comes from french settlers to the island during colonial rule. Chardon béni which Trinis pronounce as shadow benny means blessed thistle. Although not the same plant it's appearance is somewhat remniscent of the blessed thistle plant (Cnicus benedictus) that is native to southern France. 

Bhandhania is the other local name for culantro and it comes from the large East Indian descended population. Dhania comes from the Hindi word for coriander seed. It must be noted that culantro is not related to the coriander plant (Coriandrum sativum). Interestingly, both plants have the same smell and taste with culantro being the more intensely flavoured of the two. Use twice as much cilantro if substituting it for chardon béni in your recipe. 

Across the Caribbean it is also known as Chardron benee (Dominica), coulante (Haiti), recao (Puerto Rico) and fit weed Guyana).


Portuguese Thyme

I expect that I might be the last remaining Trinidadian who remembers that this was once called Portuguese thyme, so called because this is used in Garlic Pork (the local version of Carne de Vinagre e Alhos). Garlic Pork is a traditional Portuguese West-Indian Christmas dish.  Over the years Trinidadians started calling this Spanish Thyme which is very confusing because there is another herb that is also called Spanish thyme. 


I remember consulting my grandparents the very first time I made garlic pork. I have fond memories of my 2nd generation Portuguese grandparents guiding me through the process and instructing me that I was to use Portuguese thyme. It is also called by this name in the first locally published cookbook, Sylvia Hunt's cooking: Proud Legacy of our people. Whatever the correct name might be, I will continue calling this herb Portuguese thyme if only for sentimental reasons and remembrances of my grandparents. 


So that there can be no confusion, its botanical name is Lippia micromera and it also goes by the name of False Oregano. In the United States it's called Mexican Oregano. Even thought it smells and tastes very similar to true oregano, the plant is actually more closely related to lemon verbana. The flavour is a little more intense than true oregano so a little goes a long way. 


French Thyme (thymus vulgaris) 


Spanish Thyme (Big Leaf Thyme)

The final variety of thyme that Trinidadians love to throw into this mix is Spanish Thyme (Plectranthus amboinicus). Yet another thyme that is not a thyme but we call it thyme anyway. Yikes!  It's other local name is big leaf thyme because of its broad leaves. I don't often include this one in my green seasoning mix. 


Still confused by the various types of thyme. Here is a photo taken from the blog of my good friend Cynthia and used with her kind permission. This should make it easier for you to identify the different varieties.

Spanish thyme is another herb with an oregano-like flavour. It is even more strongly flavoured than Portuguese thyme and because of the similarities I find it unnecessary to use both at the same time. It can overpower if used too liberally. When I do use it, it's never more than a leaf or two as it has the tendency to darken the seasoning mix and turn dark green to black. I prefer to see a brighter green mix.


In Trinidad no distinction is made between Green onions or scallions and chives. They are all called chives (local pronunciation Sigh-ve ) and are used interchangeable in the making of green seasoning. My preference is for  the slightly more onion flavour of the scallions for my marinade. 


Trinidad pimento peppers 
Trinidad pimento peppers are also known as seasoning peppers. I would have to say that pepper is adored by Trinidadians and is easily the most popular cooking pepper in our country. Unfortunately it is little known outside of the Caribbean or places that have a large West Indian population. The flavour is really impossible to describe. When you cut it it smells like its going to be hot and I suppose it can be said to have the flavour of a hot pepper but without the heat if that makes sense. It is most definitely not a sweet tasting pepper like a bell pepper. Some people will also use scotch bonnet peppers. 

Before I begin, let me assure you that there are no standard amounts for this recipe. I usually judge if it is right by smell not taste. After awhile you will develop a sense of what is right for you. 


Trinidad Green Seasoning
Yeild 9 ( approx 2 cups)

4 bunches leaf celery
2 bundles culantro ( or 4 bunches cilantro)
1 bundle Portuguese thyme - 12 stalks or so ( or substitute with oregano )
2 bundles French thyme
3 bundles of scallions (or chives)
10-12 Trinidad Pimento peppers ( substitute banana peppers)
2 leaves of big leaf thyme (optional)
1 head of garlic ( about 10 cloves)
1/8 - 1/4 cup water or *vinegar  (*optional-  this preserves the seasoning mix if it is to be kept in the fridge longer than a week) 


Method
Wash the herbs and de-seed the pimento peppers.
Rough chop all ingredients and put into a food processor or blender.  Puree the herbs adding a small amount of water, vinegar or lime juice so that mixture can turn easily in the processor. The consistency should be that of a chunky pesto. Some people prefer a more watery blend it's up to you. 

Green seasoning can also be frozen in an ice tray. You pop out a cube or two when needed. If freezing you can omit the vinegar. You will find that over time the colour darkens in the fridge. This is normal and it is perfectly fine. 


Tuesday, February 12, 2013

A move forward and a look back

I know it seems like once again I have fallen off the face of the earth. I haven't. However last month we moved house and the new place doesn't yet have an Internet connection. Not having access to the Internet is a bit like falling off the earth, isn't it? 

Seriously, phone company you could have told us when we applied for service that your technicians don't 'fish' for cable. It would have saved everyone a huge waste of time. Cable guys we have called it in four times and told your office that the house is 200m from the road. Three 3 different guys have come by and still, no hook up. Sheesh! Walk with enough cable, already! 

Honestly, a month without any kind of technology and we are all like "Goodnight John-Boy," up in here. 

So how did we get here? Well two years ago, my husband and I purchased what we optimistically called a fixer upper. Looking back at this photo, I am willing to concede that might have been a-glass-is-half-full, kind of description.

The reality was actually a nightmare of  exposed wiring, bare concrete floors and walls that were clearly once inhabited by the crooked man of English nursery rhyme fame.

But see, here is the thing... on the day we went to view the house, we saw this first.


Can you say SOLD!

Its funny at the time I wrote this post we had no idea that we would ever have anything more than a postage stamp, sized garden. Now that we are staring at the the reality of something more, we are starting to question our sanity. Words like insane and crazy have been tossed about but I prefer the term visionary :-) Apparently so did the bank.

It would seem that my husband and I are in possession of some mad powers of persuasion. No one was more surprised than we were when we managed to secure financing for this project. This was achieved in part by waving this picture around and describing the surrounding scenic views of green hills and the lush vegetation.  


Hey did we mention the view of the waterfall from the front porch? 

Okay, so most days its a small spring but on rainy days the mountain opens up and it is quite spectacular. 

Interior renovations are complete and we have moved in. Most of the 'neighbours' including this magnificent falcon have already popped by for a meet and greet.

Understandably our first meals here were quite simple. The kind of thing that doesn't need a recipe. This is a simple red pear, walnut salad that I topped with pomegranate seeds and served with a store-bought strawberry balsamic vinaigrette. Being surrounded by all this green makes me think of salads and wholesome meals.


A lot of work remains to be done on the outside of the house but my new kitchen is a dream. Hopefully it won't be long again before we have an internet connection and I look forward to sharing with you the meals that come out of it as we settle in.